Showing posts with label Polish Finish = Metallic. Show all posts

Saturday, March 19, 2011

A Simple Gold Sponge Mani


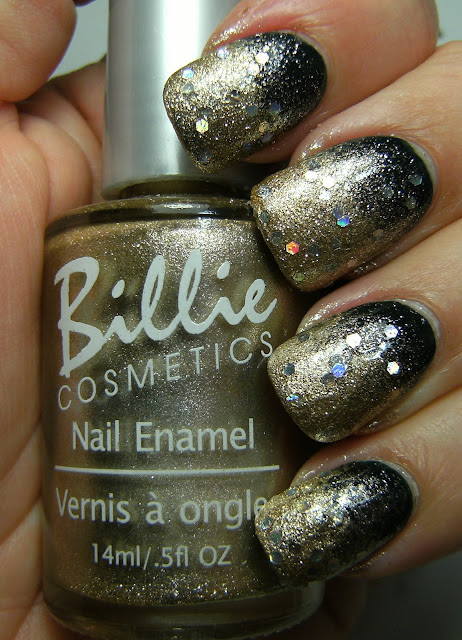
The polish's I used for this look were Icing Manic Monday, Billie Gold, Icing no-name gold shimmer and ELF Golden Goddess. I sponged the Billie Gold metallic polish over my nails, then sponged on the no-name Icing polish over that and -extending past- the gold, then applied 1 coat of ELF Golden Goddess. I need another coat or two of Top Coat for ELF Golden Goddess..... it looks really lumpy plus the base on it is matte = but it dries fast for me so I am not complaining.


Icing Manic Monday - a dark, dark green

Billie Gold - thick metallic gold, very opaque & dries fast

un-named Icing polish - gold shimmer

The gold hearts did not hang on overnight..... many of them fell off. So today I removed what was still hanging on and sponged over my nails.


Polish's I used for this Mani
L-R Icing Manic Monday, Billie Gold, Icing no-name gold shimmer, ELF Golden Goddess

I sponged 3/4 of my nails with Billie Gold, and thick gold metallic polish.


L-R
* Sponged 3/4 of nail with Billie Gold
* Sponged on a sheer, shimmery gold polish, leaving a small area of the green base polish
* added 1 coat of ELF Golden Goddess
* Added Top Coat


and my Pot Of Gold St Patrick's Day from yesterday....... those little beads surprised me, I thought they would all fall off, but a surprising amount stayed on, even though I did alot of crafty things today.

Before                                                                                                 After


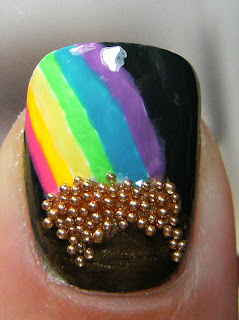
My nail is at different angels, so it looks like a totally different more rounded shape. I didn't think of doing a before/after till I loaded these photos. I think I would like these beads in clear, and pastel colours. Nail polish dissolves the finish on non NAIL ART micro-beads.

I set these into wet Top Coat but the colour still bled.


Friday, May 7, 2010

Claire's - '14 Karats' with Nailene Black French Tip Pen & Fing'rs Nail Stickers

Claire's - '14 Karats'  2 coats with Nailene Black French Tip Pen & Fing'rs Nail Stickers
 
 
Claire's has ( or had ) a few of these foil-ish metallic's that I think are great. They apply well and are generally 2 coats. I love how after applying a top coat most of the brush strokes disappear ~ It's neat. Here I have used 2 coats of Claire's '14 Karats' and a coat of Nailene Acrylic Strong Top Coat. After sporting this fabulous colour for the afternoon, I applied a regular curved french tip guide up-side down and on the diagonal across the tip of my nail. Then I used Nailene Black French Tip Pen but as you can see in the close-ups = I totally fudged this up and probably should have not been blabbing on the phone and riffling through boxes at the same time.  I saved this with these cute butterfly stickers I found at walmart.
 
When I was certain everything was dry and my stickers were in the right spot, I slapped on another coat of Nailene acrylic Strong Top coat and called it a day.
 
 indoor fluorescent

Romantic Lamp Light

 indoor fluorescent

So; on my thumb at the very bottom, is without top coat and the brush strokes are very evident (which I think is cool with metallic and foil finish polish it looks industrial-) but with a coat of T.C. the shimmery-ness of this polish is more evident and the brush strokes are less evident.
 
Romantic Lamp Light
Stuff I used - Claire's 14 Karats, Nailene Acrylic Strong Top Coat, Black French Tip Pen & Fing'rs Stickers


@ 2 coats w/ T.C. = no clean-up
apply French Tip Guides
@ A swipe of Nailene Black French Tip Pen........ wait for it to dry and touch up if necessary. I tried to touch it up but resorted to awesome butterfly nail stickers.
Apply adorable nail stickers
When everything is dry, apply 2 coats of T.C. when using these Nailene french tip pens, a top coat is needed to seal it in. It is a water based product and must have a top coat or a sheer polish to protect it.


Thursday, March 25, 2010

♥ Midie # 374 ♥


 I like the subtle pink in this polish! This very in-expensive bargain polish looked sooooo pretty at just 1 coat, but my application skillz were lacking. The brush handle is a weird huge oval shape and I had tonnes of brush marks So I had to do two coats. Anyhoo, I love how industrial this polish looks, it is very shimmery, dimensional and sparkly, but has a hard edge as well.....

My INDEX finger is 3 coats of Midie #374 and the rest of my nails have 2 coats of Billie 'Black' with 2 coats of Midie #374 layered over top. The photos with a black background I am wearing a top coat.


w/T.C.


 ♥


Related Posts Plugin for WordPress, Blogger...